Red (for Valentine’s day) Peacekeeper Part 1

Standard

Edit note: I am publishing my drafts. Enjoy this one from 2014. I do not know where the images are for this post, which is why I kept delaying publishing.

The Facts

Fabric: stash fabric that I had on hand

Pattern: McCall’s M4745

Year: 2004

Notions: interfacing, thread

Time to complete: about 16 for this test

First worn: to try on and check for fit

Wear again? I doubt so, but I may be able to modify it to something that can be worn?

Total Cost:  Less than $10. I think that the fabric was either purchased on clearance or I was able to get it from my Mom during one of her fabric purging sprees. The interfacing was left over from a previous project.

I am super in love with all things steampunk and we have been watching Farscape on Netflix. It is only natural that as a result, Mr. Uncommon Geek has requested that I make him a Steampunk Peacekeeper outfit for use at local steampunk events as well as various conventions and possible photo opportunities.

The first step is to find the appropriate pattern. I’m not sure that it is possible to purchase a pattern of this particular cosplay item so I am using what I have available.

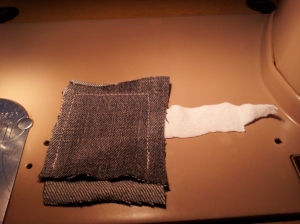
This McCall’s pattern is the closest that I have to the Peacekeeper vest. I need to modify the sleeves and the front panels. I also have to take away the bottom part and extend the length of the top by about 3 inches. If all goes well, Part 2 should look more like the final product and with any luck Part 3 will look and fit like the Peacekeeper vest that he is looking for.

Happy Sewing!


Hufflepuff scarf DIY

Standard

Group costumes are fun to do. This most recent Halloween was no exception. However, for whatever reason, I really did not feel like going all out when making my costume. My coworkers and I decided to do Harry Potter themed costumes. We decided to go the easy route and be Hogwarts students. I was able to find a Gryffindor robe at my local Goodwill. I had the black skirt, white button down shirt, and grey sweater in my closet. I don’t really think of myself as possessing grand amounts of courage, so I chose to go with Hufflepuff as my house. I purchased a tie from Hot Topic, and printed out a sticker of the house crest to cover the Gryffindor crest on the thrifted robe. Since it is possible to have large amounts of snow during Halloween in Ohio, I wanted to make sure to have as many warm elements to my costume as possible. A scarf with my house colors seemed like a really good idea. I was able to find this tutorial here: http://www.craftster.org/forum/index.php?topic=431081#axzz2sCK8PZ00

I decided that I wanted the colors to alternate for the front and back of the scarf, as well as from side to side. Obviously, I did not think it through completely, as this would result in a checkerboard type finish and not look at all like any of the Hogwarts merchandise already in existence, whether officially licensed or fan made. Plus, in my efforts to get the colors as close as possible to the tie that I had purchased, I ended up with a scarf that looks more like a sports ball fan item than a magical student fan item. So, I highly recommend that you follow the instructions as laid out by graverobbergirl if you are going to follow her tutorial. Don’t be like me and end up with a scarf that looks like it would be worn by someone who doesn’t even know what Quidditch is. Or do. I’m not your supervisor.

Anyway, I did most everything as instructed by graverobbergirl, changing only the number of pieces that I cut out to give me equal numbers of each color. I had a 4×6 card that I was able to use as a pattern guide to cut out the majority of my pattern pieces.

20161016_165146.jpg

Once I had all my pieces cut out, all I had to do was sew them together in alternating colors. And, voila. A scarf that I didn’t even wear with my costume. Hey, they can’t all be wildly successful experiences. Sometimes things don’t turn out as planned. This has taught me that if I want my end result to look like someone else’s end result, then I probably shouldn’t change their pattern.

Happy sewing!

EDIT: Apparently this entry didn’t get posted after I wrote it. I was probably planning on adding a picture of how the scarf turned out, but I no longer have the scarf in my possession, so that is unlikely to happen. If I am able to find an image, I will add it in the future. Thanks for reading!

Sock creature – Slenderman inspired

Standard

I like to use socks and bits of fabric to make little creatures. Usually, I will try to make something cute, and it will end up a little creepy looking. It will be completely unintentional. I will fully intend to make an owl, or a dog, or a cat. But I make the eyes just a little bit too big. Or the legs don’t come out quite right. Or everything turned out like it was supposed to, but something is just a little bit off about the whole thing. Over time, I have begun to embrace the fact that my sock creations will end up being a little creepy whether I intend for them to or not. And there are times like now, when I decide that I will make something creepy, just to make something creepy. One of my friends showed me a picture of Slenderman. I had not heard of this creature before they showed me the picture that they found so creepy. I had been in the middle of creating a sock creature, and they were reminded of Slenderman by my creation. By the time that creature was finished, it no longer looked like Slenderman, but the idea had been planted in my brain.

First, I am starting with a sock:

20170122_171333This one has already been used for something, but there is plenty of sock left for what I need. I sewed up the top for the head. Then I cut the bottom to create the legs, and sewed them up as well.

20170122_171428

Then I took the other sock and cut the really long arms. I also cut the heel of the second sock for the ears. I know part of what makes Slenderman so scary is the lack of face. However, I am making a Slenderman inspired creature, not a Slenderman sock creature. One day I may make a creature wearing a little black suit, with a black tie, and without a face. Today is not that day.

20170122_172026I sewed up the arms, stuffed them, and attached them to the body. Then I sewed up the ears and attached those as well. All that I have left is to create a face. Or not. I haven’t decided yet.

20170126_205312

Happy Sewing!!

Cat bed

Standard

The weather here has been very weird for January. It had gone from cold and wintery, to warm and springlike, back to arctic and snow. It all just makes me want to stay in bed until spring really and truly arrives.

Since I am unable to hibernate until March, I decided to at least let our kitties have a chance at staying comfortable as they can be while the pendulum of nature swings back and forth between winter and summer. I sewed up a cat bed for another project I hope to get back to at some point during the summer. It was so easy to sew up and put together that I didn’t realize that I forgot to take pictures until I was done. So I did the only thing a cat owner can do – I made another one. Two cats means a minimum of two cat beds.

20170113_181200

Continue reading

Pollo alla Cacciatora

Standard

Happy New Year!!

20161215_073850

While I am staying warm and defining my specific goals for 2017, one of which includes creating something each week of the year and blogging about it, I thought I would share a recipe that is loved in my house. This recipe is Pollo alla Cacciatora (Hunter’s Wife’s Chicken). I got the recipe from a cooking pamphlet that my mom was getting rid of (but thankfully, it is also available online!)

Continue reading

Celebrating Ugly Christmas Sweater Day!

Standard

December 16, 2016 was Ugly Christmas Sweater Day. Did you participate? What was once a gift people dreaded receiving has now become a reason to celebrate during the holiday season. There are many places selling sweaters specifically designed to be ugly, as well as sweaters that someone thought was cute, but isn’t quite suited to everyone’s tastes.

Continue reading

week 45 – Aprons

Standard

The Facts

Fabric: mystery cotton

Pattern: McCall’s Easy Stitch & Save M5358

Year: recent, yet anachronistic

Notions: thread, snaps

Time to complete: a week

First worn: for Halloween party at work

Wear again? Hopefully

Total Cost: $25 for time and materials

20151005_185521

As I have stated before, my coworkers told me that I would be Alice for our work Halloween party, because I have the hair for it. I knew that I had this pattern, and I knew that it would be perfect for an Alice in Wonderland apron. I was planning on using this pattern to make a pinafore for a long time. Now, I no longer had any reason to put off making it any longer. This is the first thing that I made for my Alice costume.

I was expecting a super quick, really easy, beginner level sewing pattern. This is not a super quick, really easy, beginner level sewing pattern. The other aprons featured in this sewing pattern might be beginner level, but this apron is more along the moderate level of sewing capabilities. It uses things like button holes, narrow seams, gathering and basting stitches, and ruffles. I know, I know, ruffles can be used in beginner sewing patterns. This pattern just did not feel like a beginner level pattern. I’m glad that I started with it, because I started on the apron about a month before Halloween. I gave myself plenty of time and I took things slow. One day, I cut out the pattern pieces. Then I put everything aside and started construction the next day. Whenever I got to a point that was too frustrating or confusing, I just laid everything to the side and walked away. Sometimes I would come back to it in the same day. Other times, I would come back the next day. It all ended up working out in the end.
The only modification that I made was that I did not add the ruffle along the bottom of the apron. This ended up making me miss a step where I was supposed to hem the side and bottom of the bottom of the apron. As I have already said, it all ended up working out in the end. I was able to finish all of the edges, hide all of the seams, and make both the front and the back of the apron look good. I knew that the apron would be the main part of the costume that everyone would be able to see, so it was very important for it to turn out well, and it did. There were several people who did not believe that I had made my costume, because it did not look homemade to them.

20151020_071853


20151020_071905

While I am very happy with how different pieces of the costume turned out, overall I think I could have done better. Maybe next year, my group will win first place instead of second! What do you recommend for four coworkers to dress up as for a work Halloween party?

Happy sewing!

week 34 – Collared. Making something with a collar. TAG: Collared

Standard

The Facts

Fabric: mystery cotton blend

Pattern: made from approximating what other internet patterns were doing

Year: 2015, also – timeless

Notions: ribbon, thread

Time to complete: 1 hour, approximately

First worn: for work Halloween costume contest

Wear again? Possibly

Total Cost: $5.00, figuring time and materials

My workplace loves to celebrate the holidays. Every year for Halloween, we have a costume contest. There are prizes for the best individual costume, as well as for the best group costume. There are also prizes for the runner’s up. My coworkers told me that we are going as Alice in Wonderland, and that I would be Alice. I looked in the thrift stores for a dress that would be suitable, however I was unable to find one. I then looked for a pattern that would be simple, and capture all of the elements of Alice’s dress. I was unable to find one of those as well.

So, I made an Alice costume. Her dress in the movie includes a full skirt, puff sleeves, and a peter pan collar. I had trouble with the bodice of the dress, so I made the peter pan collar separate. There are a multitude of free patterns for all sorts of cute different peter pan collars. I somehow managed to miss the start of the trend of the peter pan collar necklace, but it seems to be still going pretty strong. I used the same fabric that I used for the dress, cut it, and sewed it with ribbon used for the closure. I’m not sure that I like how it looks on me. It seems to be too big to just wear as an accessory, but it works for the costume.
More pictures of the rest of the outfit to come soon.

Happy sewing!

Cat post 2

Standard

See, I told you all that I would try to write more often. Slowly but surely I will get back into the habit of making time to write about the things that I am attempting to create.

This time, I am here to talk about cat toys. The kittens that we are fostering really like to try to hunt and “kill” whatever is around them. I decided it might be best to give them a lot of options that would be safe for them to destroy.

I had a pair of jeans in my fabric stash that Mr. Uncommongeek decided to get rid of due to a rip that could not be repaired. Denim is a super rugged fabric that can be very durable. As noted previously, I also have a seemingly endless supply of stuffing. As a side note, should I decide to make more in the future, I also happen to have a supply of catnip that I am not using here, simply because the kittens are too young to really be affected by it.

20150919_110811

I cut out a bunch of small pieces of the denim. Then I sewed them in various ways. The kittens are very small, so I wanted to be able to have something that is small enough for the kittens as they are now, but also some bigger pieces for when they are older.

Most of the shapes that I sewed were pretty square. First, I sewed up 3 sides.

20150919_111103

Then stuffed the pouch and sewed up the final side.

20150919_111252

I did the toys in two rounds to see which kind would be more popular of a toy. I like the look of the toys with the seams on the inside, but the kittens both seem toprefer having a flap of exposed seam to bite into. The exposed seam is also the side that they hold when they carry it around in their mouth. I also attached tails on the second round, just to make the toys more interesting. I decided not to add anything else because I definitely want to avoid any sort of choking hazard, or potential accidental ingestion.

Happy sewing!

20150921_183049

Cat post 1

Standard

Hey blog sphere, sorry that I haven’t been taking the time to write to you guys. I will try to remedy that with a couple of posts coming up.

Mr. Uncommongeek and I have been fostering a couple of kittens. We were successful in finding them new forever homes, and I was able to use some fabric out of my stash to make things to go with cute little balls of fluff as they journey to their new life.

One of the first things that I made is beds. I know that most cats love laying on soft things that they can curl up in, and if it resembles a box lid, then all the better. I also know that pet beds are super expensive and I don’t have that kind of money to spend on a cat who would probably turn their nose up at it anyway.

A while ago, I had purchased a couple of sweaters either from Goodwill, or a local thrift shop, so I could make various craft things and stuff. Needless to say, the things that I was attempting to create didn’t work out so well, and I never tried to figure out what to do to improve upon my mistakes. Which left me with a bunch of sweater pieces.

I also have all sorts of stuffing and blanket batting. I have purchased stuffing, but my friends and family are aware of my craft supply hoarding problem, and supply me with their surplus every time that they are clearing out their stash. I have been trying to utilize this surplus at every opportunity that I am able, but I feel like this is a substance that will multiply when you are not paying attention.

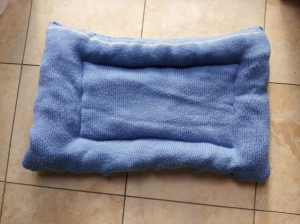
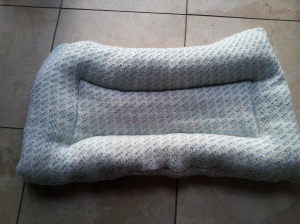
To make the kitty beds, I used a piece of sweater that had been cut off straight across below the arm holes. I then made sure that three sides were sewn up, leaving the bottom hem of the original sweater unsewn.  I then cut a piece of batting to be about the size of the sewn sweater piece and placed it inside the sweater. Then I sewed the middle part down to create a bed area and a side rail area. Next, I stuffed the side rail area with stuffing that I had on hand. Once that was stuffed to my liking, I hand sewed up the last side of the bed and let the kittens choose which one they wanted.

20150913_183427

20150913_183320

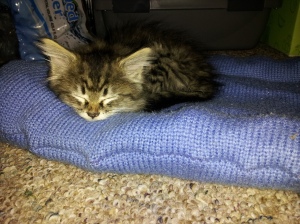
Overall, the project was pretty easy and I completed both beds in one afternoon. I know that they are not perfect, but it was my first attempt and I wasn’t really looking to make them perfect, just usable. The kitties seem to like them, and that is what really matters.

20150913_183751

20150913_183801

20150913_204447

Happy sewing!