Supposed to be MadeThisLook Actually is – Finally finished this Christmas present!
The Facts
Fabric: Two twin size flat sheets, 10 t-shirts, and one yard of licensed Star Wars flannel for the binding
Pattern: Self drafted
Year: current
Notions: Thread, fusible fabric stabilizer, quilt batting, bleach
Time to complete: I am not sure of the exact number, but it was over 40 hours. It was one full day to lay out and secure the layers together (8+ hours) and it was two full days (16+ hours) to hand sew the binding around the edges since my sewing machine refused to sew all layers together. It was two days (16+ hours) cutting, ironing, and figuring out the spacing, layout, and all other details.
First worn: Presented January 2014 as a belated Christmas present
Wear again? Hoping to get a lot of use out of this for many years to come as it is very warm and cozy.
Total Cost: The most expensive part was the quilt batting, which I remember ended up being more than I expected, even though I purchased it on sale. Some of the shirts had to be purchased new (thrifted) since I was unwilling to cut up some of what I had available due to size constrictions. The flannel that I used for the binding, I managed to catch on sale for 50% off which made me incredibly happy. I did not keep track of my receipts and I can not tell you how much it ended up costing in total.
Fairly early in 2013, Mr. Uncommon Geek moved out to Washington State to embark on a new job opportunity. The plan was to have me follow as soon as I got my craft collection small enough to move easily. It was around that time that I got the idea of what I would make him for Christmas. My limited knowledge of the Pacific Northwest includes the idea that the winters are cold with the type of chill that you never really warm up from. I had both sheets at that time and I purchased the quilt batting…at some point. I don’t remember if I purchased it for this project or for something else prior to this project.
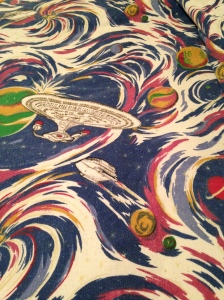
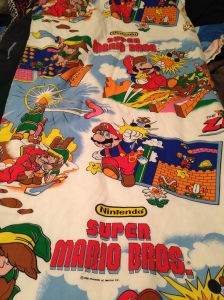
I first noticed a problem when I laid out the sheets with the batting. Even though both sheets were a twin size, the Star Trek sheet was considerably skinnier than the Nintendo sheet. This meant that I would have to add to the Star Trek side or take away from the Nintendo side. It also meant that I would have to trim the excess batting away. I don’t remember how much I paid for the batting, I just remember having sticker shock even after the discount was applied. Trimming the bamboo batting away didn’t really seem like a good option.
I had taken the pieces that I had over to my parents’ house as they have more available floor space to work in. My mom knows a lot about sewing and she suggested that I use the Nintendo sheet to fill in the Star Trek side and to use as the blanket binding around all of the edges. Having read accounts from other bloggers who have worked with sheets like these, I wasn’t sure if I really wanted to cut into either sheet and risk turning them into some sort of shredded nightmare. The question became how to add fabric without compromising what is already there.
I dived into my crafting supplies to find something that would fill in the spots and make it a cohesive unit. I had settled on a piece of green fabric, but wasn’t really happy about how it looked with the green on either the Nintendo or the Star Trek design. I put the whole thing aside and decided to not worry about it for awhile.
Sometime around the end of October, I realized that Christmas was approaching more quickly than I would like to admit, monetary resources were severely limited as I had just been laid off from my job, and I still had to figure out the challenges that this project presented. In researching ideas for how to make a quilt, the thing that seemed to pop up most was how to make a t-shirt quilt.
I did some more research into it and found that a t-shirt quilt is just a bunch of 15in x 15in squares sewn together. The t-shirts are stabilized with an iron on stabilizer to keep the knit from stretching and make sure that the squares stay square. It is probably the easiest way to introduce someone into quilt making because there are no small fabric pieces to worry about, and the seam allowances don’t have to be as exact as they do for the more intricate quilt blocks. One of the variations of t-shirt quilt even has strips of fabric in between the t-shirt squares for added height and width, as well as a more uniform and quilt-like appearance.
After reading a few tutorials on how to put together a t-shirt quilt, I knew that I had found the answer that I had been looking for and I was able to use some of the Uncommon Geek’s old t-shirts out of my crafting stash. Unfortunately, not all of the shirts that I was able to excavate out of my crafting jungle would work, and I was not able to find all the shirts that I thought would be available. I went to the thrift store and was lucky enough to find some shirts that would work for this project. I did end up purchasing more that what I needed as I have a tendency to fail at math, but that just gave me more options to choose from, and I now have more t-shirts to use for future projects.
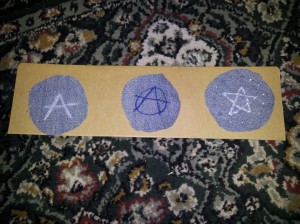
The good news for most of November and December is that I was able to find a job and work pretty much 40 hours every week. The downside was that I pretty much ended up exhausted and trying to figure out how to work on this project with Mr. Uncommon Geek at home. The answer was that I slept when I got home from work and just did not work on the quilt at all. I let him know that I would not have his gift done in time for Christmas and he graciously was ok with that. After the New Year’s bustle died down, so did my hours at my part-time job. I worked on this quilt as much as I could, guessing a lot of the time with the measurement, cutting, and placement of the t-shirts. I tried to assemble the blanket at home, but found that there is no flat space in our apartment large enough to lay the blanket flat. I also found that there were some holes in the Trek sheet. I mended the Trek sheet with some scraps of one of the shirts that I used. I bleached the shirt to look like one of those home done galaxy prints that I have been dying to try out.
![Quilt2[1]](https://mrsuncommongeek.files.wordpress.com/2014/02/quilt21.jpg?w=225&h=300)
After I measured, cut, and sewed together the t-shirts to the sheets, I took all of the pieces over to my parents house to secure all three layers together. Thankfully, I come by my love of books naturally and there was no shortage of weights available to make sure that nothing shifted on me as I put them all together. My mom thought it funny and unusual that I was using books to weigh down the quilt. Yes, J.K. Rowling, Andre Norton, and J.R.R. Tolkien are all helping here, along with many others. Like I said, I come by it naturally.
Once I had all of the pieces sandwiched together, I still had to put blanket binding around the edges. When I had gone to the craft store to price and hopefully pick up the four packages of binding needed, I found that each package was around $8 and that it would be $32 to use the satiny stuff that would be a pain to sew down. (I have used it to make a baby blanket before. The experience was not something that I care to repeat.) Knowing that the binding is a pain and that it would be difficult to sew in the cramped space around my sewing machine, and that I am not willing to spend another $30 to finish the blanket, I wandered around the fabric store looking for inspiration.
I found it in the licensed fabric section. They have fabrics printed with things like Star Trek, Star Wars, DC, and Marvel. It made me giggle to myself because there is this giant sign that says “STAR WARS” and it has Star Trek and Star Wars all grouped together.
Anyway, one of the sewing blogs that I follow has instructions for how to make bias binding out of fabric so you can make your own binding for whatever project that you are working on. I was able to put all of this knowledge together and realize that I could buy one yard of fabric and make my own blanket binding for less than the cost of one package of pre-made binding. It was just a matter of figuring out which one to get.
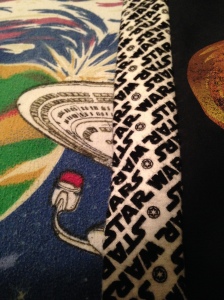
I finally settled on the black and white Star Wars repeating because of a few things. One: even though there are no Trek shirts, one side is mostly Trek so it does not hurt to balance things out by having this much Wars all around. Two: the fabric is flannel which makes it soft, warm and pretty perfect for use in blankets. Three: the pattern is small and would not be overwhelming, nor would it be lost entirely once the fabric got cut into strips. Four: The Nintendo Fabric had a lot of white in it, the Trek fabric has a lot of dark colors in it, and most of the t-shirts are some shade of dark or black. By using a black and white print, I don’t have to worry about color matching and it helps to unify the different pieces that I am working with.
Although frustrating at times, this is something that I am really happy to have made. Mr. Uncommon Geek said that he has never before received a gift that so accurately captured who he is so completely and is now in the process of writing a blog describing what the different parts mean to him personally. This winter has been the coldest, most wintery winter that we have had to deal with in many years here in Ohio and I am very glad to have this cozy blanket to snuggle underneath. I am a little disappointed that we are not spending the winter in the Pacific Northwest where, every time that I check, they are consistently warmer than we are with less snow as well. However, it also means that this blanket would not have turned out like it did, and we would not appreciate it in the same way.
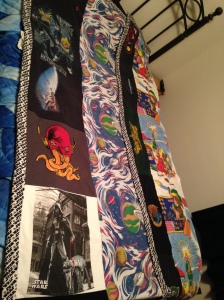
Here is how I laid it out so Mr. Uncommon Geek could see all of the different t-shirts that I used, as well as both the Star Trek and Nintendo sheets.
Happy sewing!


![20140203_184804[1]](https://mrsuncommongeek.files.wordpress.com/2014/02/20140203_18480411.jpg?w=300&h=225)
![20140203_184716[1]](https://mrsuncommongeek.files.wordpress.com/2014/02/20140203_1847161.jpg?w=225&h=300)
![20140203_184657[1]](https://mrsuncommongeek.files.wordpress.com/2014/02/20140203_1846571.jpg?w=300&h=225)
![20140203_184728[1]](https://mrsuncommongeek.files.wordpress.com/2014/02/20140203_1847281.jpg?w=225&h=300)
![20140203_184739[1]](https://mrsuncommongeek.files.wordpress.com/2014/02/20140203_1847391.jpg?w=225&h=300)


You must be logged in to post a comment.